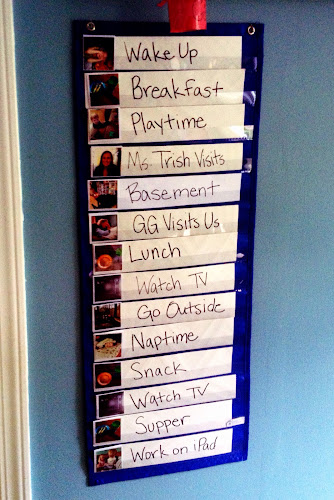
One of the very first things the therapists encouraged us to do to help Little Handsome was to make a visual schedule. Practically speaking, I was completely overwhelmed by this. We were starting new therapies/ evaluations all over the place and the thought of such a ginormous arts and crafts situation was sending me to crazy town. It literally consumed my thoughts constantly for like three weeks before I put pen to paper - like that twenty page paper I would always put off until the night before in seminary.
We tried a picture exchange system (PECS) pre-made off eBay. While it was worth the twenty bucks for a few weeks, eventually it drove me bananas with its fifty million cards, Velcro and the fact that Little Handsome wanted to take it in the car despite its large size. Then our ABA therapists encouraged us to only use photorealistic pictures, not cartoon-like ones. Peace out PECS - you weren't a good fit for us (although you have been a life-changer for many nonverbal kiddos).
I even had a meeting with our ABA therapist to talk about how to accomplish it...yeah, that cost us 75 buckaroos peeps. Even though I researched Pinterest, etc like a madwoman, I couldn't find exactly how to get from a to b. And when your brain is already somewhat fried, that's what I needed. After much trial and error, here is what's working for us right now. So here is what I did for our large visual schedule that a hangs in our kitchen...
Step 1: Buy a pocket chart.
Step 2: While you are waiting for that to ship, start taking pics of daily routine stuff like a madwoman. At first I was very detailed, like taking pics of his toothbrush, brush, him taking off his PJs, don't do that to yourself at first. Your brain will explode. Here are some that we use on a daily basis: waking up, getting his sister, breakfast, lunch, snack, supper, nap time, watch tv, playtime, outside, pic of his ABA therapist, get ready to go(there are three pics on that one card) - I think I probably have about thirty I use on a weekly basis in the kitchen visual schedule.
Step 3: format pics. I had requirements in my head for the next two steps - affordable, easy, and I wanted each pic to fit on the cards for the pocket chart without having to reformat craziness on my Mac. So to the joy of my friends and family who follow me on Instagram, that's what I used. I did everything on my iphone. Taking the pics with my phone, I used Frametastic (another app) to put four pics in one Instagram pic, then published them on Instagram.
Step 4: print pics. Then I used the Walgreens app to print Instagram square prints at my local Walgreens in an hour- dont't think you can print your square pics on 4x6s to save money and cut off the excess - it doesn't work without major finagling on your part. Check retailmenot for coupon codes for photos at Walgreens to save money before you purchase.
Step 5: Before cutting, laminate. This is related to my next post on an on-the-go schedule. I chose to laminate the pics because I knew I would also be using them for that and the run-of-the-mill paper they use at Walgreens would not have withstood Little Handsome. I bought this great little laminator at Walmart for around twenty five dollars. Worth. Every. Penny. I have used it for all sorts of things.
Step 6: cut those bad boys up - do yourself a favor and use either a cheapie papercutter or one at your church or office. I have only just recently organized the probably hundreds of photos I have that now include daily routine, people, and places. More on that later.

No comments:
Post a Comment